
Introduction
This article intends to make getting set up developing WordPress in a Docker environment as quick and as painless as possible. From the Docker compose file to the WordPress side setup of Mailhog - everything is explain and the full code required is available for you to copy.
You should also note that although you have the ability to just copy and paste the code given, you should try to understand what each part of the code is doing as this will allow you to extend, modify and take full control of your environment in the future.
A Note on Local Development
Local development with WordPress is pretty simple to setup with your bog standard LAMP stack software such as XAMPP, but as you may discover in the future, it's not always sunshine and rainbows when it comes to deploying your project to a production server which uses completely different software and software versions. In particular, the PHP version of your local software can cause major issues if you are working on more than one project at a time.
Using Docker will tremendously help with reducing the number of gotcha moments when developing WordPress and even help to speed up your time to market!
What is Docker?
Docker is an application that enables you to set up entire self-contained environments with a commands. As each of your containers is basically a virtual machine, you’re free to set up different technology stacks as needed, including WordPress.
With Docker we can quickly swap between version of PHP, SQL and even between Nginx and Apache.
Getting Started
Compose File
To get start with Docker, all you need is to create a docker-compose.yml file in the root directory of your project. This compose file is essentially a set of instructions for Docker to use when you run the docker-compose up command which runs the container.
Inside your docker-compose.yml file, you can add the following which is explained in detail below.
services:
  db:
    image: mysql:8.0
    volumes:
      - db_data:/var/lib/mysql
    ports:
      - '${FORWARD_DB_PORT:-3306}:3306'
    restart: always
    environment:
      MYSQL_DATABASE: wordpress
      MYSQL_USER: wordpress
      MYSQL_PASSWORD: pass
      MYSQL_ROOT_PASSWORD: pass
      MYSQL_ALLOW_EMPTY_PASSWORD: 1
    networks:
      - wordpress

  phpmyadmin:
    depends_on:
      - db
    image: phpmyadmin/phpmyadmin
    restart: always
    ports:
      - '8081:80'
    environment:
      PMA_HOST: db
      MYSQL_ROOT_PASSWORD: pass
      UPLOAD_LIMIT: 500M
    networks:
      - wordpress

  wordpress:
    depends_on:
      - db
    image: wordpress:latest-php8.3
    ports:
      - '80:80'
    restart: always
    volumes: [ './:/var/www/html' ]
    environment:
      WORDPRESS_DB_HOST: db:3306
      WORDPRESS_DB_USER: wordpress
      WORDPRESS_DB_PASSWORD: pass
      WORDPRESS_DEBUG: 1
    networks:
      - wordpress

networks:
  wordpress:

volumes:
  db_data:
Depending on the version of Docker you have installed, you may need version: '3' at the top of your docker-compose.yml file.
This compose file tells Docker that we need the following:
- WordPress should be running on http://localhost
- PhpMyAdmin should be running on http://localhost:8081
- PHP 8.3
- MySQL 8.0
You can start and stop the WordPress Docker container with the following commands in the terminal at the root of your project:
docker compose up -ddocker compose downWhen you visit http://localhost:8080 for the first time after a new installation, you will see the default WordPress install screen which prompts you for the usual details such as site name, site admin credentials and then the database credentials. As you can see in the MySQL section of the Docker Compose file, the database login credentials are:
- wordpress
- pass
As you probably noticed if you ran the command, Docker installed all of the files WordPress needs into your root directory. From here you can simply add an existing theme or plugin you are developing to the relevant subdirectory of wp-content and begin developing!
Fixing Permissions Issues with the Files Created by the WordPress Docker Image
Depending on your operating system, you may need to fix the file permissions for the WordPress core files generated by Docker. If you don't have permissions to modify the files then you will not be able to change the WP_DEBUG value or modify the plugins, themes and uploads directories.
You can simple fix the permissions by running the following command in the terminal:
sudo chmod -R 775 ./Increase PHP Upload Limit
Increasing the upload limit for our WordPress setup requires us to setup a uploads.ini file and tell Docker where that file is. We can do this by simply creating a uploads.ini file in the root of the project (in the same directory as the docker-compose.yml file) and adding the following settings:
file_uploads = On
upload_max_filesize = 256M
This will allow WordPress to upload content up to 256mb.
For the Docker container to be able to use this ini file, we must modify the volumes block of our docker-compose.yml file, like so.
 wordpress:
    depends_on:
      - db
    image: wordpress:5.9-php8.1
    ports:
      - '80:80'
    restart: 'no'
    volumes:
      - ./:/var/www/html
      - ./uploads.ini:/usr/local/etc/php/conf.d/uploads.ini # Add this line
    environment:
      WORDPRESS_DB_HOST: db:3306
      WORDPRESS_DB_USER: wordpress
      WORDPRESS_DB_PASSWORD: pass
      WORDPRESS_DEBUG: 1
    networks:
      - wordpress
Finally, we can restart the container and the new settings will take effect.
Testing E-Mails with Mailhog or MailTrap
There are a variety of options when it comes to testing emails in a local environment, including Mailtrap.io and Mailhog. My personal preference is, however, Mailhog due to the fact we can simply add an image to our docker-compose.yml file and instantly be able to connect WordPress just by simply using a filter.
MailHog Setup with Docker and WordPress
To setup MailHog we need to tell Docker to include the image within our WordPress container. This is a simple as adding the following to our docker-compose.yml file between the WordPress and PhpMyAdmin images.
  mailhog:
    image: mailhog/mailhog:latest
    ports:
      - '1025:1025'
      - '8025:8025'
    networks:
      - wordpress
Now we have the Mailhog image included inside our container we need to tell WordPress to send all mails to the service. This is done with a filter and can be placed in your functions.php
add_action( 'phpmailer_init', function ( $php_mailer ) {
    $php_mailer->Host     = 'mailhog';
    $php_mailer->Port     = 1025;
    $php_mailer->From     = 'wordpress@localhost.test';
    $php_mailer->FromName = 'WordPress';
    $php_mailer->IsSMTP();
}, 10 );

add_filter( 'wp_mail_from', fn( $email ) => 'wordpress@localhost.test' );

add_filter( 'wp_mail_from_name', fn( $name ) => 'localhost' );
The additional filters for the from address and from name are required for PHPMailer to send emails.
You may test the setup by using the wp_mail function and checking the Mailhog inbox at http://localhost:8025/ to see if the setup is working as intended.
add_action( 'init', function () {
    // Example inside the the init hook to ensure that the PHPMailer settings are applied before trying to send the email.
    wp_mail( 'hello@example.com', 'Test Email', 'Hello Mailhog' );
});
MailTrap.io Setup with WordPress
The Mailtrap setup is pretty similar to the Mailhog setup, however you will need to get your username and password for your account from Mailtrap. Once you have your credentials, you can simply add the following to your functions file. Changing the username and password values to the correct values from your account.
add_action('phpmailer_init', function($phpmailer){
  $phpmailer->isSMTP();
  $phpmailer->Host = 'smtp.mailtrap.io';
  $phpmailer->SMTPAuth = true;
  $phpmailer->Port = 2525;
  $phpmailer->Username = '::username::';
  $phpmailer->Password = '::password::';
});
Extending the Environment
Now we know how to actually setup the WordPress environment inside Docker with PHPMyAdmin, MailHog and the database we can look at how you would compose your own compose file which is extremely easy now you know the basics.
Changing the WordPress or PHP Versions
Docker Hub is where you will find a full list of images, like the ones we used in the docker compose file. Let's take a look at the image for WordPress, found here: https://hub.docker.com/_/wordpress
Now, this huge list under Supported Tags can be daunting at first, however, it's just simple a list of versions you can use when adding the WordPress image to your list of services. In our compose file, we've set WordPress to use version 5.9-php8.1, which means we need WordPress at version 5.9 running on PHP version 8.1
If you needed a different version of WordPress, a different version of PHP or even the CLI version of WordPress, this is the list you would look at to know which version to tell Docker we need.
Modifying Configuration Values for the WordPress Image
In our docker compose file, we've set four configuration values: the database host, username and password and finally set WP_DEBUG to true.
As you can see from the documentation provided by the developers of the image, there are quite a few more options you could use.
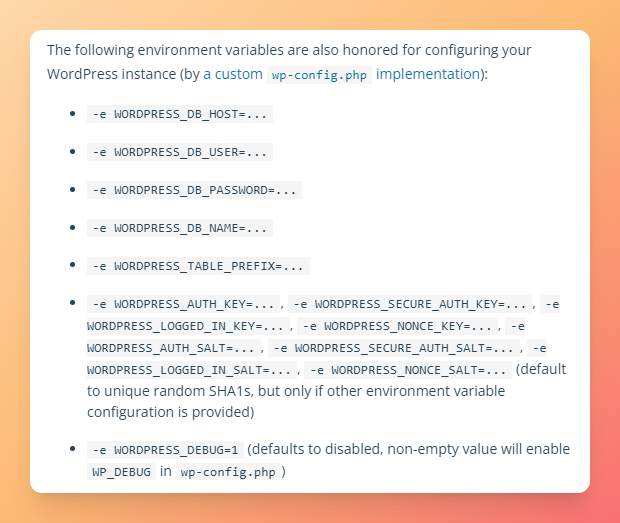
Combining these environment variables will allow you to truly tailor your development environment to match your production environment. To tell Docker what these variables should be, you would simply add them to the environment block inside the WordPress service in our docker compose file.