
Why Tailwind?
Adding Tailwind to my workflow has been the biggest single increase in productivity that I've made. In the past I was developing the front-end my WordPress themes using Bootstrap, making use of its components and then modifying the styles in another CSS file.
The most recent versions of Bootstrap allow us to modify the variables used to generate its CSS but in my opinion this is the slower option in terms of productiveness.
The CSS file Tailwind produces is a staggeringly low file size, averaging ~150kb in my experience and the best part? The file only contains CSS classes that you've actually used.
Unlike other CSS frameworks which are component based you won't have hundreds of classes that are never used anywhere in your theme. If you've used frameworks such as Bootstrap in the past then you will instantly notice the blank slate approach offered by Tailwind. This is one of most powerful features and the very reason many of us are drawn into using it. This blank slate approach allows us as developers to create a truly unique design without being drawn into a framework like Bootstrap's aesthetic feel.
It is worth noting that Tailwind does offer a CDN approach, however this simply isn't suitable for a production environment. The CDN version contains all the utility classes included in the framework and there contains an enormous amount of bloat, meaning we lose all the performance improvements we've gained by moving to Tailwind.
This article aims to show you how to set up Tailwind to work with WordPress, allowing Tailwind to do what it does best without changing any default WordPress behaviour. With the minimal set up example in this post you can tailor the environment to match you needs.
Installing Tailwind and Required Packages
First we need to install the required packages from NPM, if you don't already have a package.json file within your project, you can create one by running npm init in the terminal with Node.js installed.
The following command will install all the packages we need for development. If you're new to using NPM packages, the node_modules directory is only used for development and will not be pushed to production with the rest of your theme. The code we need from those packages is simply used by the build step by Tailwind and are not required for production.
npm install -D tailwindcss postcss autoprefixer postcss-cli @tailwindcss/typographyConfig File
Now we need to create the config file that Tailwind will use to identify files in our theme that it needs to watch in order to regenerate its CSS file. This file is used to modify the plugins Tailwind is going to use and the theme options such as its color palette, more on this later in the article.
To get started, run npx tailwindcss init or create a file named tailwind.config.js in the root directory of your theme and add the following content.
module.exports = {
    content: [
		"./template-parts/**/*.php",
	    "./*.php",
        "./js/*.js"
    ],
	theme: {
		extend: {},
	},
	plugins: [
        require('@tailwindcss/typography')
   ],
}
The last config file we need is the PostCSS config file which, this config file controls the setting for the CSS pre-processer we're using, PostCSS. Create a file named postcss.config.js.
module.exports = {
	plugins: {
		'tailwindcss': {},
		'autoprefixer': {},
	}
 }
CSS File Setup
We need to add Tailwind's directives to our CSS file to allow Tailwind to add the CSS to our output CSS file. Add the following to the top of your ./css/style.css file. Each of the directives adds one of Tailwind's layers.
@tailwind base;
@tailwind components;
@tailwind utilities;
Setup The Watch Command
To allow us to start the JIT compiler we need an NPM script to tell Tailwind where to output the final CSS. We do this be adding an element to the scripts block of the package.json file.
"scripts": {
	"watch": "npx postcss ./css/style.css -o ./css/style.min.css --watch"
}
Now we're ready to go! Run the npm run watch command and Tailwind will begin compiling into the output CSS file. Running this command will start a process in the terminal which you should leave running while you are developing the theme. As you save the files listed in the tailwind.config.js file, Tailwind will read the classes you have used and add or remove them from the final CSS file.
npm run watchEnqueue the output CSS in WordPress
The ./css/style.css file is just our developer file, this shouldn't be loaded on the front-end. The style.min.css file should be loaded instead.
add_action('wp_enqueue_scripts', function(){
    wp_enqueue_style('theme-css', get_stylesheet_directory_uri() . '/css/style.min.css');
});
While developing your theme I recommend you add a version parameter to your asset enqueue function so the browser is forced to use a fresh version of the file on every refresh, you can do this by adding time() to the 4th parameter of the function.
add_action('wp_enqueue_scripts', function(){
    wp_enqueue_style('theme-css', get_stylesheet_directory_uri() . '/css/style.min.css', [], time());
});
Styling Content from Guttenberg
As the content inside the admin post editor isn't being watched by Tailwind, we have two options. We can either use the safe list feature which will allow us to add a list of classes we want Tailwind to always include in our final CSS output or we can use the typography plugin that we installed at the start of this article.
Option A - Typography Plugin
The typography plugin has already been set up if you followed along with this article. Implementing it is as simple as adding the prose class to the wrapper of our the_content() call.
<div class="prose">
    <?php the_content(); ?>
</div>
What Does "prose" do?
Prose is a class that will target all the child elements and format them like the browser would before Tailwind reset the user-agent stylesheet. With the prose class we can target segments of our theme that come from the back-end, whether that be WISYWIG editors or the Gutenberg editor.
You should be aware the prose does apply quite a lot of changes, including font color so you will want to go over the resulting styling with a fine tooth comb and ensure that the design is still adhere to your brand guidelines or design.
Modify Prose Styles
You can modify any parts of the styles the prose class applies using the following syntax:
<div class="prose prose-p:text-red-500">
    <?php the_content(); ?>
</div>
Which will turn all the paragraph tags to red. As this can become a huge list of classes when you are trying to style your blog posts to match your theme I prefer to simple assign the prose classes to a blog-content class, as seen here
.blog-content {
    @apply prose w-full max-w-full prose-li:marker:text-primary prose-img:w-full
                 prose-headings:mt-4 prose-h2:text-4xl;
}
Adding this snippet to your CSS file will allow Tailwind to generate a blog-content class with all of those styles inside it.
WordPress CSS Overrides Tailwind
WordPress will still load its own styles CSS file, which will override some of Tailwind's classes due to the use of the !important directive within WordPress' CSS. For pages without the use of Gutenberg blocks I recommend you dequeue the style files loaded by WordPress, including the list of CSS variables with colors. You can do this by adding the following to your functions.php file which will disable WordPress' CSS files on the home page and archive pages, other conditions for disabling can be added to the if statement, such as if_single('post') to disable WordPress style on blog posts, although this is not recommended due to the end-user actually using the Gutenberg blocks in that context. You can learn more about disabling WordPress' CSS files in my article regarding WordPress performance.
add_action( 'wp_enqueue_scripts', function () {
    if ( is_front_page()
            || is_home()
            || is_archive()
    ) {
        wp_dequeue_style( 'global-styles' );
        wp_dequeue_style( 'wp-block-library' );
        wp_dequeue_style( 'wp-block-library-theme' );
    }
}, 100 );
Prose Browser Compatibility
The typography Tailwind plugin makes use of the :where() selector which isn't support by any Internet Explorer version and only version 88+ for Chromium browsers. For a full list of browser support you can check out the "where" selector on caniuse.com.
Option B - Safelist & Manually Writing Styles
Option one is a tedious task, and you can often miss the classes you need by doing it that was, however if you wish to have full control over what classes appear in your final CSS file, then this option is the way to go.
Defining the safe list
Defining the safe list is as simple as adding an array to the tailwind.config.js file we created earlier.
safelist: [
    'bg-red-500',
    'text-3xl',
    'lg:text-4xl',
],
The settings block shown above will ensure that bg-red-500, text-3xl and lg:text-4xl are always added to the CSS file regardless of whether they've been used or not.
You should keep this method in mind for future development of the theme as you may come across a situation where you must allow a class from Gutenberg or a WISYWIG editor to be used in the final output as a one off for a particular piece of content.
Manually Writing the Styles
As Tailwind cannot apply styles to the HTML produced by Guttenberg or a WISYWIG editor we must apply the styles ourselves, which we can do by using the @apply directive in our CSS file which will then add the style rule to our final CSS file without having to use it in any of the files Tailwind is watching.
This can be a tedious approach and can become a mess once you build up a collection of blog posts with a variety of styles.
.blog-content h2 {
    @apply text-3xl font-bold mt-8 mb-4;
}
Tailwind and Template Parts
Using template parts with Tailwind is a game changer and works at its best when pair with the templating feature WordPress offers. For most use cases page templates should consist of individual template parts which are then comprised of more templates.
Not only does this allow us to keep our code DRY, it allows us to be able to focus on the classes that are controlling the styling of certain elements on the final page - having huge blocks of HTML with a dozen classes can quickly become complicated to understand which classes is causing an issue you are trying to find.
Adding Styles to WordPress Menus with Tailwind Example
Navigation menus generated by WordPress are a little bit more tricky to apply styles to due to the way they spit out HTML without any concern to your front-end stack. The solution to this is to use the @apply directive and style the classes WordPress uses for its menus.
This is my go-to boilerplate for styling WordPress menus which you can use as a starting point for your navigation menus.
<nav class="list-none pt-2 hidden lg:flex">
    <?php
    wp_nav_menu( array(
        'theme_location' => 'header-menu',
        'fallback_cb' => false,
        'container' => false,
        'items_wrap' => '<ul id="%1$s" class="%2$s flex items-center text-sm xl:text-base space-x-4 xl:space-x-8 font-bold">%3$s</ul>',
    ) );
    ?>
</nav>
.menu li {
display: block;
}
.menu li:not(.menu-item-has-children) a {
display: block;
}
.menu .menu-item-has-children {
position: relative;
}
@media (min-width: 1024px) {
.menu .menu-item-has-children ul.sub-menu {
@apply absolute bg-white pt-6 pb-3 px-3 shadow-2xl min-w-[200px] left-0 border-b
border-b-gray-200 z-10 transition-all duration-200 ease-in-out translate-y-5
opacity-0 pointer-events-none;
}
}
.menu .menu-item-has-children ul.sub-menu li {
@apply w-full;
}
@media (max-width: 1024px) {
.menu .menu-item-has-children ul.sub-menu li {
margin-top: 0.75rem;
}
}
.menu .menu-item-has-children ul.sub-menu ul.sub-menu {
left: unset;
padding-top: 0.75rem;
right: calc(100% + 0.1rem);
top: -0.7rem;
box-shadow: unset;
}
@media (max-width: 1024px) {
.menu .menu-item-has-children ul.sub-menu ul.sub-menu {
padding-top: 0;
text-align: center;
}
}
@media (max-width: 1024px) {
.menu .menu-item-has-children ul.sub-menu {
text-align: center;
}
}
.menu .menu-item-has-children:hover > ul.sub-menu {
@apply flex translate-y-0 opacity-100 pointer-events-auto
}

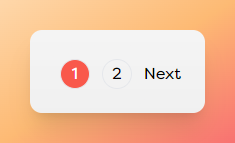
Styling WordPress Pagination with Tailwind Example
Similar to the problems presented by the navigation menus generated by WordPress, the HTML for pagination links generated by WordPress contains unused classes so we must use the @apply directive to style it.
.pagination {
  @apply flex justify-center;
}

.pagination .nav-links {
  @apply flex mx-auto space-x-3 items-center;
}

.pagination .nav-links a, .pagination .nav-links span {
  @apply block text-center py-0.5 bg-transparent text-black transition-colors duration-100
ease-in-out;
}

.pagination .nav-links a.current, .pagination .nav-links span.current {
  @apply bg-red-400 text-white;
}

.pagination .nav-links a:not(.next):not(.prev), .pagination .nav-links span:not(.next):not(.prev) {
  @apply w-[30px] hover:bg-opacity-80 border rounded-full border hover:border-red-400;
}
Separate CSS Components
As your theme becomes more complex, when styling things like the blog-content class mentioned above and the pagination/navigation features your CSS file can become cluttered. To address this issue, you can create standalone CSS files which contain the styles for the relevant component and use PostCSS' import directive to allow PostCSS to compile those files into the one production CSS file. Let's take a look at how to do that.
Installing PostCSS' Import Plugin
For this we need to install the postcss-import plugin and load it in our postcss.config.js file.
npm install -D postcss-importmodule.exports = {
plugins: {
'postcss-import': {},
'tailwindcss': {},
'autoprefixer': {}
},
};Import Standalone CSS Files
Now we can import our standalone CSS files into our final output. Resulting in a highly organised, separated CSS source.
@tailwind base;
@tailwind components;
@tailwind utilities;

@import './wp-nav-menu-styles';
@import './wp-pagination-styles';
@import './blog-content-styles';
Generating The Color Palette for Your WordPress Theme
As you've most likely noticed, Tailwind allows us to use colors with several shades, for example text-red-300 would be a lighter shade of red. But what about our brand colors/guidelines? We can't just pick the closest color Tailwind has to offer.
To solve this problem, Tailwind allows us to extend its color palette and even override the default colors. With tools like Tailwind Shades we can input our brand colors and generate JSON with shades of that color which we then add to the tailwind.config.js file. Below is an example with #F97316.
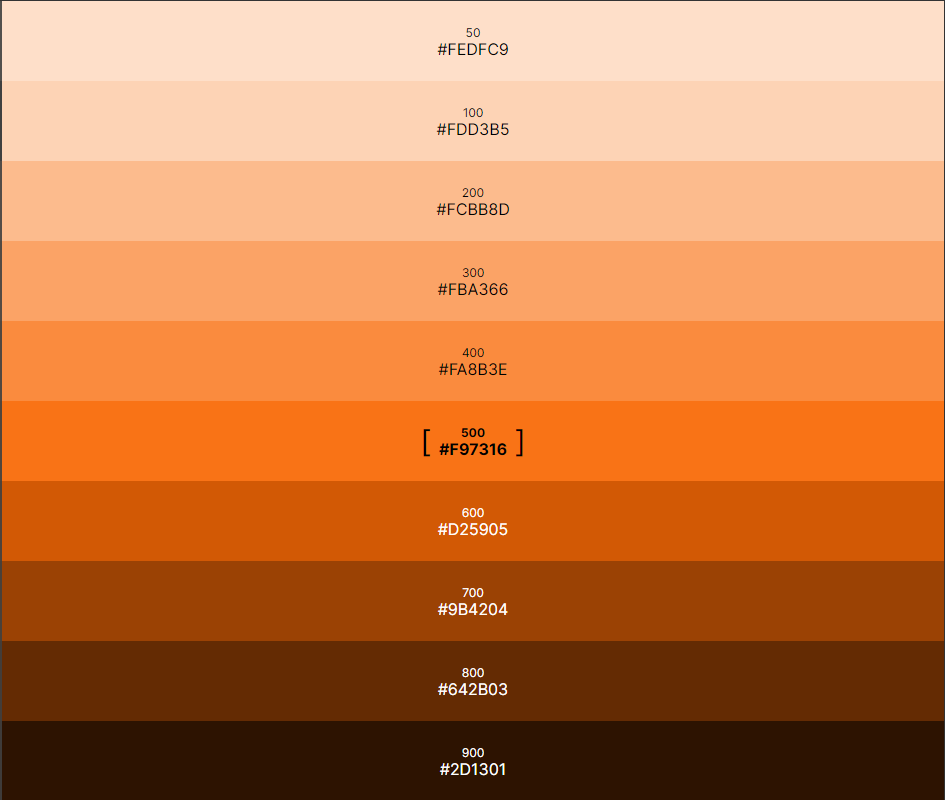
'orange': {
  DEFAULT: '#F97316',
  '50': '#FEDFC9',
  '100': '#FDD3B5',
  '200': '#FCBB8D',
  '300': '#FBA366',
  '400': '#FA8B3E',
  '500': '#F97316',
  '600': '#D25905',
  '700': '#9B4204',
  '800': '#642B03',
  '900': '#2D1301'
},
As you can see the shade 500 is the default color, and we may use the color without a shade specified, for example bg-orange is equal to bg-orange-500.
To include this in Tailwind you need to modify the theme block of the tailwind.config.js config file, here you can add as many colors as your design dictates.
You may use the arbitrary styles feature of Tailwind v3 to use one off colors, for example "text-[#f7f7f7]" would result in "color: #f7f7f7;" rule being applied.
theme: {
    extend: {
        colors: {
            'orange': {
                DEFAULT: '#F97316',
                '50': '#FEDFC9',
                '100': '#FDD3B5',
                '200': '#FCBB8D',
                '300': '#FBA366',
                '400': '#FA8B3E',
                '500': '#F97316',
                '600': '#D25905',
                '700': '#9B4204',
                '800': '#642B03',
                '900': '#2D1301'
            },
        }
    },
},